Monday, February 6, 2012

Sandcastle Version Information - Part 3/3

Building the Platform Information
This is the final part of this series and we will discuss how to create the platform information using the illustrative samples from the previous article.
The platform information simply provides additional metadata to the build system, making is possible to display extra information about the API. You will see this extra information as platform icons displayed by the API, showing which API is supported by a given platform.
Note that this feature is not currently customizable, that is it applies only to MSDN defined customization. With the current MSDN release, there are two main framework groups or version frameworks; the .NET Framework and the Silverlight Framework, under these various platforms are defined as outlined below:
  • .NET Framework Group
    • .NET Framework (main platform): Not icon supported.
      Versions: 4.5, 4.0, 3.5, 3.0, 2.0, 1.1, 1.0
    • .NET Framework Client Profile: No icon supported.
      Versions: 4.0, 3.5 SP1 (Cannot tell what happened with 4.5).
    • .NET Compact Framework: Not available in newer versions of the MSDN.
      Versions: 3.0, 2.0, 1.0.
    • XNA Framework: Icons are displayed by newer MSDN, but versions are displayed only by the older MSDN.
      Versions: 3.0, 2.0, 1.0
    • Portable Class Library: No platform and version identifiers are defined by the Sandcastle.
      Version: Portable Class Library.
  • Silverlight Framework Group
    • Silverlight (main platform): No icon supported.
      Versions: 5.0, 4.0. 3.0 (earlier versions are not available in MSDN).
    • Silverlight for Windows Phone: Sandcastle does not current define version identifier for the Windows Phone OS 7.1, but could be easily added.
      Versions: Windows Phone OS 7.1, Windows OS 7.0
    • XNA Framework: The icon supported is the same was that under the .NET Framework by the Sandcastle. However, the MSDN currently displays different icon for this.
      Versions: XBox 360, Windows Phone OS 7.0
Clearly, the newer platforms (Portable Class Library, .NET Framework Client Profile etc) and versions (.NET Framework 4.5, Silverlight 5.0 etc) are not supported by the current release of the  Sandcastle. Versions identifiers (IDs) are easy to extrapolate (even though some inconsistency exists in the naming), but platform identifiers (IDs) are not.
Also, the current MSDN elevated Silverlight to its own framework group, but is not well supported by the current Sandcastle, since at the time of release, no Silverlight documentation existed in the MSDN.
These issues can be fixed if required, and we will be looking into them as part of the Sandcastle Assist release issues.

Platform Builder
The platform metadata is defined in a file specifying the platform (marked by the platform ID) under which each API in a documentation is supported.
Sandcastle is open source project developed internally by Microsoft, but the sources for some tools such as the VersionBuilder.exe are not released. The platform file format and the tool for building it are also not released.
The information we are presenting here are obtained from the study of the platform build component, transformation styles and the resource contents. We take the responsibility for any error contained in this article.

Platform File
From the study, this is the format of the platform file we came out with, it is an XML file:

<?xml version="1.0" encoding="utf-8" ?>
<platforms>
    <platform name="platformId" version="versionId">
        <namespace  name="api" include="boolean">            
            <type name="api" include="boolean">
                <member name="apidata/@name eg. ToString" include="boolean"/>
                <member name="apidata/@name" include="boolean">
                    <!--
                    @api: This is the member API. Eg: M:System.Object.ToString
                    @types: The parameter types, separated by comma
                    @name: The parameter names, separated by comma
                    -->
                    <overload api="api" types="" names="" include="boolean"/>
                    <overload api="" types="" names="" include="boolean"/>
                </member>
            </type>
        </namespace>
    </platform>
</platforms> 

The following points are not obvious from the format as presented above:
  • Multiple Platform IDs
    You can have multiple platform IDs for a specific version. The multiple platform IDs are separated by comma (,).
  • Multiple Versions IDs
    Similar to the multiple platform IDs, you can have multiple version IDs for a particular platform. The multiple version IDs are separated by comma (,).
Except to keep it compact, using multiple platform IDs or version IDs does not make any special difference in the file format, since these are split up by the build component that consumes this file. We have not found any use of the multiple version IDs. However, for the multiple platform IDs we have, and the provided code for building the platform file handles this automatically.
The following is a partial platform file generated from the attached sample:

<?xml version="1.0" encoding="utf-8"?>
<platforms>
  <platform name="SilverlightPlatforms,silverlight" version="silverlight_v4">
    <namespace name="N:TestProject" include="true">
      <type name="T:TestProject.TestClass" include="true">
        <member name="ToString" include="true" />
        <member name="Equals" include="true" />
        <member name="MemberwiseClone" include="true" />
        <member name=".ctor" include="true" />
        <member name="Method1" include="true" />
        <member name="Property1" include="true" />
      </type>
      <type name="T:TestProject.TestOther" include="true">
        <member name="GetHashCode" include="true" />
        <member name="GetType" include="true" />
        <member name="Finalize" include="true" />
        <member name="MemberwiseClone" include="true" />
        <member name=".ctor" include="true">
          <overload api="M:TestProject.TestOther.#ctor" types="" 
   names="" include="true" />
          <overload api="M:TestProject.TestOther.#ctor(System.String)" 
   types="System.String" names="name" include="true" />
        </member>
        <member name="Method1" include="true" />
        <member name="Name" include="true" />
        <member name="Property1" include="true" />
        <member name="Value" include="true" />
      </type>
    </namespace>
  </platform>
  <platform name="Xbox360,xnafw" version="xnafw10">
    <namespace name="N:TestProject" include="true">
      <type name="T:TestProject.TestClass" include="true">
        <member name="MemberwiseClone" include="true" />
        <member name=".ctor" include="true" />
        <member name="Method1" include="true" />
        <member name="Property1" include="true" />
        <member name="Property11" include="true" />
      </type>
    </namespace>
  </platform>
</platforms>

Platform File Builder
In this section, we will present information on the tool used to generate the platform information file starting with the input files.

PlatformBuilder: Reflection Data Input Files
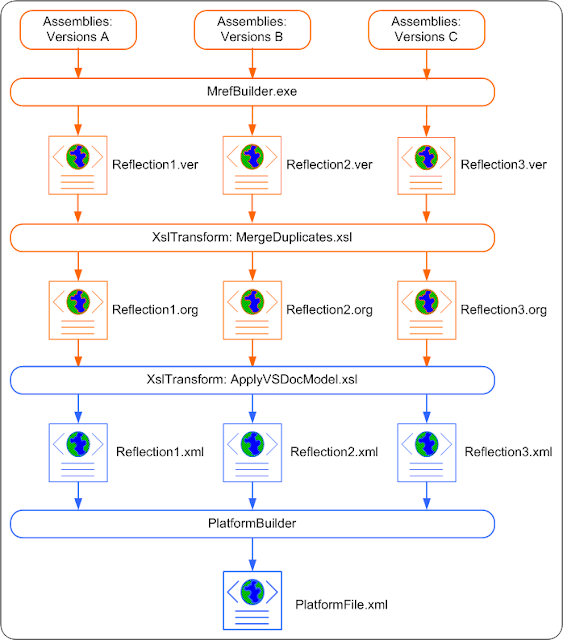
In the second part of this series we discussed the VersionBuilder tool, which uses as input the raw reflection data files and combines this to create a raw single reflection data file.
Unlike the VersionBuilder, our PlatformBuilder uses the processed reflection data files as input files. That is, after the document model is applied to the reflection data. It might be possible to use the raw reflection data, but for simplicity and our desire to minimize the memory requirements by using XmlWriter, we found the processed format more easier to consume.
Now, revisiting the version building process, the platform building process can be added in a modified diagram as shown below (the extension is shown in blue, the version builder part is removed for simplicity):


PlatformBuilder: Configuration Input File
This is really not a requirement of the code presented with this article. The code is presented in the source form as private static methods so that it can be modified and used in various forms.
For this article, we used this procedure, which we think will fit in most applications; reuse the VersionBuilder configuration file. We exposed one public static method which uses this and has this declaration:

public static bool Create(string configFile, string platformFile,
    bool isSilverlight);

where:
  • configFile: The VersionBuilder configuration file generated in the version information processing.
  • platformFile: The output platform file.
  • isSilverlight: Specifies whether we are dealing with the Silverlight Framework Group or the .NET Framework Group. This parameter is currently not used.
This method will parse the configuration file, retrieve the raw reflection data files, change the extensions to .xml (from the .org), load the processed reflection data files and then build the platform file.

NOTE:
  • This method will not convert the raw reflection data files to processed reflection data files, it assumed this was done and processed files are in the same directory as the configuration file.
  • Using this procedure will limit you to creation of a single platform information file, even though this is not a requirement of the build component.
In the third sample project to demonstrate the platform information, we modified the PreBuilder.bat to add the support for transforming the raw reflection data files to the processed reflection data files.


Processing the Documentations
After creating the platform file(s), the only other requirement for platform information is to configure the build component.
The build component used here is: PlatformsComponent.
The configuration of this component is similar to the following:

<component type="Microsoft.Ddue.Tools.PlatformsComponent" assembly="%DXROOT%\ProductionTools\BuildComponents.dll">
    <!-- The order of filter files in this config determines the order of platforms in the output. -->
    <filter files=".\PlatformFile.xml" />
</component>

Note that this build component is not added to the default Sandcastle configuration file and you must add it yourself.
This is a Pre-Transform component and the position selected is based on sample configuration files found in the Sandcastle source repository. We have not tested other pre-transform positions in the configuration file, you are invited to experiment.

We are ready for the processing, so lets consider some test configurations. Since platform icons are not supported by user/custom platform IDs, we will reconfigure the previous version information file to use the standard platform and version IDs. You do not have to worry about the VersionSharedContent.xml file since its content is useless and will not have any effect on the build process.

.NET Framework Group
For the .NET Framework Group, we will use the following version build configuration (VersionBuilder.config) to demonstrate the platform information:

<versions>
    <versions name="netfw">    
        <version name="netfw35_1" file=".\reflection4.org" />
        <version name="netfw35" file=".\reflection3.org" />
    </versions>
    <versions name="netcfw">
        <version name="netcfw37" file=".\reflection2.org" />
    </versions>
    <versions name="xnafw">
        <version name="xnafw10" file=".\reflection1.org" />
    </versions>
</versions>

NOTE: We are now using the right order; placing the latest versions first in the configuration file.

With this configuration, these are some of the images of the output:


Silverlight Framework Group

For the Silverlight Framework Group, we will use the following version build configuration to demonstrate the platform information:

<versions>
    <versions name="silverlight">    
        <version name="silverlight_v4" file=".\reflection4.org" />
        <version name="silverlight_v3" file=".\reflection3.org" />
    </versions>
    <versions name="silverlight_mobile">
        <version name="silverlight_mobile_v1" file=".\reflection2.org" />
    </versions>
    <versions name="xnafw">
        <version name="xnafw10" file=".\reflection1.org" />
    </versions>
</versions>

With this configuration, these are some of the images of the output:


NOTE: As you can observe when you compare the second images from each output, the framework members are not displayed or are filtered out in the Silverlight group. This same issue affects the user/custom platform.
The only reason we could attribute to this is; Sandcastle currently treats the Silverlight (and its related frameworks) as sub-platforms on the .NET Framework - this being the main platform. We can modify the transformation styles to resolve this issue if required.

Sample Test Applications
The test applications in this article are available for download. Use this to test the platform information.


The sample and codes are released under the Ms-PL license, which is used by the Sandcastle. You can use it anyway you like.
NOTE: This is a zip file shared from the Google Docs. If the download button is not displayed when clicked, you can download the zip file from the File menu.

Conclusions
This completes the information required to build a better platform and version information using the Sandcastle tools.
In the Sandcastle Assist project, we hope to make the Sandcastle tools easier to use, and as with the Sandcastle conceptual topics supports, which we documented and exposed to all, we have documented and hopefully exposed the platform/version information support to all.


We will work on the remaining issues with the platform and version information support. If you have any issue or suggestion, please leave a comment here or on the Sandcastle project forum. Thank you.

Friday, February 3, 2012

Sandcastle Version Information - Part 2/3

Building the Version Information
We will discuss how to build the version information using very simple illustrative code samples. We will create a standalone application (independent of other libraries) so that the knowledge can easily be used in other applications.
Lets review the build process in the Sandcastle and then examine the changes required for the version information

General API Processing
In this section, we will discuss the procedure used by the Sandcastle system to build a documentation. By providing the outline of the processing, we will not only make it easy for all to get an overview of the documentation process, but also make it easy to mark the points in the processing stages that must be changed for version and platform information.
This is the processing procedure for a typical Sandcastle API documentation:

1. Initialization
This is nothing special, clean up previous build outputs and/or create working/output directories.
The main inputs; the assemblies to be built and the corresponding XML comments files, may also be copied to the appropriate directories during this stage.
The most important processing here is to copy the Sandcastle resources (styles, scripts, icons or images) for the chosen model to the working or output directory. There is a batch file provided if you wish to do this with the command line.
Run this in the output/working directory:

...\Presentation\vs2005\copyOutput.bat

2. Reflection Builder
This involves the use of the MrefBuilder.exe tool provided by the Sandcastle. This is also the first most important stage for the version information. Let consider the input sources:
  • XML Comment Input Files
    With the exception of custom application-defined processing and filtering, the XML comments files generated by the C# and VB.NET compilers are not further processed.
  • Assembly Input Files
    By .NET reflections, the input assembly files are converted into an XML format, which represents the various API defined in the target assembly files.
    The MrefBuilder.exe tool is used and the output file is usually named Reflection.org 
The basic command line to this tool is:


MrefBuilder TestLibrary.dll /out:Reflection.org
      config:MrefBuilder.config   [options]

NOTE: The configuration file for this tool, MrefBuilder.config, determines the contents of the output. This is where API filters are defined. It also provides support for add-ins, which are used to modify and/or add extra information to the reflection output file, such as information for extension methods. This file is, however, optional. If not provided, a default file available in the Sandcastle installed directory is used.

3. Documentation Model Builder
Sandcastle provides support for building various documentation model, such as the VS2005, Hana and Prototype models. At this stage we transform the Reflection.org file to a format defined by the documentation model of choice using the XslTransform.exe tool provided by the Sandcastle. This tool uses XSL files in the ProductionTransforms directory for the processing. The output of this processing is usually named Reflection.xml.

NOTE: For multiple assemblies, you may apply the MergeDuplicates.xsl transform through the XslTransform.exe tool before this step to merge duplicates. It is not used in this case for simplicity.

Now, for the VS2005 model
  • Use: ApplyVSDocModel.xsl to create the model.
  • Use: AddFriendlyFilenames.xsl or similar naming XSL to create the file names of the various API defined by the assemblies.
The above two are normally combined on a single command line as (omitting the directory information for simplicity):

XslTransform /xsl:"ApplyVSDocModel.xsl" Reflection.org
  /xsl:"AddFriendlyFilenames.xsl" /out:Reflection.xml [options]

Below is a diagram representing the steps required to build the reflection data from various assemblies for a single version of the documentation.


4. Manifest Builder
The manifest file is the list of topics or APIs that will be documented. The manifest generator is also an XSL file and therefore processed by the XslTransform.exe tool. The input is the reflection file, Reflection.xml, from the previous step and output is usually named Manifest.xml.
The command line for generating the manifest file is given below:

XslTransform /xsl:"ReflectionToManifest.xsl" 
      Reflection.xml /out:Manifest.xml

5. Creating Table of Contents (TOC)
Like many other operations, the table of contents of the documentation is created for each model using the appropriate XSL file. The XslTransform.exe tool is used with the reflection file, Reflection.xml, as the input. The output is usually named Toc.xml file.
The command line is as follows (omitting the directories):

XslTransform /xsl:"CreateVSToc.xsl" Reflection.xml /out:Toc.xml

6. Processing the Documentations
The main processing of the documentation is done with the BuildAssembler.exe tool. The input of this tool is the manifest file created in the previous step and a configuration file. The output is usually the HTML files of the documentation.
The command line to this tool is given below:

BuildAssembler /config:"Sandcastle.config" Manifest.xml

We will not present detail description of the operation of this tool, but highlight some of the main operations and where the version information is applied.
This tool starts with a skeleton or template XML file, which defines the structure of the document model. The tool loops through each of the topics listed in the manifest file and using the information defined in the configuration file to copy in the necessary parts of the skeleton or template.

The actual processing is broken down into simpler steps, each processed by units called the Build Component. This is similar to the assembling line in a manufacturing system, giving the name of the tool Build Assembler.
The interesting thing to note about the build components is that it provides an extensible build system, so you can provide custom build component to either replace a default Sandcastle component or provide new features in the assembling process.

These are the processing steps in the build assembler:

6-1: Create skeleton document
It is similar to car assembly line; starting with a frame, fasten all other components to it and finally paint it.
The build component used here is named: CopyFromFileComponent.
The configuration of this component is shown below:


<component type="Microsoft.Ddue.Tools.CopyFromFileComponent" assembly="...\BuildComponents.dll">
  <data file="...\skeleton.xml" />
  <copy source="/*" target="/" />
</component>

The template or skeleton for the VS2005 model is shown below:

<document>
    <reference />
    <syntax />
    <comments />
    <metadata />
</document>

6-2: Copying in Reflection data
Data from both the reflection data you created in the previous step and reflection data from the .NET framework are copied into the skeleton.
The first part of this involves indexing the reflection data, which requires large amount of computer memory.
The main build component used here is named: CopyFromIndexComponent.
The indexing configuration of this component is similar to the following:

<component type="Microsoft.Ddue.Tools.CopyFromIndexComponent" assembly="..\BuildComponents.dll">
  <index name="reflection" value="/reflection/apis/api" key="@id" cache="10">
 <data base="...\Reflection" recurse="true" files="*.xml" />
 <data files=".\Reflection.xml" />
  </index>
  <copy name="reflection" source="*" target="/document/reference" />
</component>

The related steps are:
  • Copy in container data From the indexed reflection data, the container data such as the namespace and type object (for members) are copied into the skeleton.
  • Copy in explicit interface implemented reflection data From the indexed  reflection data, the explicit interface implemented information is copied in.
  • Copy in extension method template/type data From the indexed  reflection data, the extension method information is copied in.
  • Copy in parameter data From the indexed reflection data, method arguments information (parameters) are copied it.
  • Copy in templates type reflection data From the indexed reflection data, template types are copied in.
  • Copy in return type reflection data From the indexed reflection data, method return types are copied in. 
  • Copy in event handler type reflection data From the  indexed reflection data, copy in event handler types.

6-3: Generate syntax
The syntax for the various supported or selected programming languages showing the declaration of the API is generated here.
The main build component used here is named: SyntaxComponent.
The Syntax Component uses language specific syntax generators to handle the syntax generation. Each generator derives from SyntaxGeneratorTemplate class, which in turn derives from SyntaxGenerator class.
The configuration of this component, which is normally wrapped in conditional component is given below:

<component type="Microsoft.Ddue.Tools.SyntaxComponent" assembly="...\BuildComponents.dll">
  <syntax input="/document/reference" output="/document/syntax" />
  <generators>
 <generator type="Microsoft.Ddue.Tools.VisualBasicDeclarationSyntaxGenerator" assembly="...\SyntaxComponents.dll" />
 <generator type="Microsoft.Ddue.Tools.CSharpDeclarationSyntaxGenerator" assembly="...\SyntaxComponents.dll" />
  </generators>
</component>

6-4: Copying in comments
This involves indexing the XML comments of your API and comments from the .NET Framework. This also requires a large amount of memory. The CopyFromIndexComponent is configured differently as shown below:

<component type="Microsoft.Ddue.Tools.CopyFromIndexComponent" assembly="...\BuildComponents.dll">
  <index name="comments" value="/doc/members/member" key="@name" cache="100">
   <data base="...\Framework\v2.0.50727" recurse="false"  files="*.xml" />
   <data files=".\comments.xml" />
  </index>
  <copy name="comments" source="*" target="/document/comments" />
  <components>
   <!-- copy comments for inheritdoc -->
   <component type="Microsoft.Ddue.Tools.InheritDocumentationComponent" assembly="...\CopyComponents.dll">
    <copy name="comments" use="reflection"/>
   </component>
  </components>
</component>

Specialized copying operations, such as the handling of inherited documents, are handled by different components called the Copy Component, which derived from the CopyComponent class.
Like the reflection data copying, this is also broken down into several parts.

6-5: Transformation
After the API document is completely composed in memory, it is transformed to XHTML format using transformation styles defined by the selected model.
Most user or custom components in the assembling process is applied either before or after the transformation, and are classified as Pre-Transform components and Post-Transform components.
The build component used here is named: TransformComponent.
The configuration of this component is given below:

<component type="Microsoft.Ddue.Tools.TransformComponent" assembly="...\BuildComponents.dll">
  <transform file="...\main_sandcastle.xsl">
 <argument key="metadata" value="true" />
  <argument key="languages">
   <language label="VisualBasic" name="VisualBasic" style="vb" />
   <language label="CSharp" name="CSharp" style="cs" />
   <language label="ManagedCPlusPlus" name="ManagedCPlusPlus" style="cpp" />
   <language label="JavaScript" name="JavaScript" style="cs" />
 </argument>
  </transform>
</component>

The transformation to the XHTML is really not completed yet. Some XML tags are inserted by the transformation process and must be resolved.

6-6: Resolving Shared Content
The shared content is the string resources used by the transformation and other steps for customization and localization of the document.
The string resources are defined in XML file in a simply key-value format as shown below:

<content xml:space="preserve" xmlns:MSHelp="http://msdn.microsoft.com/mshelp">
 <!-- paths -->
 <item id="iconPath">../icons/{0}</item>
 <item id="scriptPath">../scripts/{0}</item>
 <item id="stylePath">../styles/{0}</item>
 <item id="artPath">../media/{0}</item>

 <!-- locale -->
 <item id="locale">en-us</item>
  
  <!-- product labels -->
  <item id="framework">.NET Framework</item>
  <item id="compact">.NET Compact Framework</item>
  <item id="everett">1.1</item>
  <item id="whidbey">2.0</item>  
</content>

NOTE: These resources include the version and platform information of the document, making this a step that must be modified to support the version information.
The build component used here is named: SharedContentComponent.
The configuration of this component is given below:

<component type="Microsoft.Ddue.Tools.SharedContentComponent" assembly="...\BuildComponents.dll">
  <content file="...\vs2005\content\shared_content.xml" />
  <content file="...\vs2005\content\reference_content.xml" />
  <content file="...\shared\content\syntax_content.xml" />
  <content file="...\vs2005\content\feedback_content.xml" />
</component>

6-7: Resolving reference links
The reference links inserted by the transformation process is resolved at this stage of the processing, using the your reflection data and the .NET framework reflection data, which is used to resolve the MSDN links to the framework documentations.
The build component used here is named: ResolveReferenceLinksComponent.
The configuration of this component is given below:

<component type="Microsoft.Ddue.Tools.ResolveReferenceLinksComponent" assembly="...\BuildComponents.dll">
  <targets base="...\Data\Reflection" recurse="true" files="*.xml" type="msdn" />
  <targets files=".\reflection.xml" type="local" />
</component>

6-8: Saving the document
Finally, the XHTML document is saved to a file and ready for compilation to any format.
The build component used here is named: SaveComponent.
The configuration of this component is shown below:

<component type="Microsoft.Ddue.Tools.SaveComponent" assembly="...\BuildComponents.dll">
  <save base =".\Output\html" path="concat(/html/head/meta[@name='file']/@content,'.htm')" />
</component>

7. Compiling the Documentations
At this stage, the HTML files are compiled into HtmlHelp 1, 2, 3 or WebHelp. In some cases, output specific tools are provided to generate the help compiler projects and in some case process the XHTML files.
For the Microsoft HTMLHelp 1 outputs, which we are creating for the sample projects, a tool named ChmBuilder.exe is provided to handle such operations. This requires a configuration file and the command line is shown below:

ChmBuilder.exe /project:ProjectName /html:Output\html
     /lcid:1041 /toc:Toc.xml /out:Help /config:ChmBuilder.config

A sample illustrative project is provided to demonstrate how to build a simple Sandcastle API document. It uses three batch files to break down the build process:
  • ReflectionBuilder.bat: This is used to create the reflection files, and it is the only batch that will change when we consider the support of version information. We will use the default configuration file for the MrefBuilder.exe tool for simplicity.
  • PreBuilder.bat: This applies the document model.
  • PostBuilder.bat: This processes the documentation and compiles the help file.
A screenshot of the Project Explorer is shown below. In this, we provided custom general and feedback contents and configuration files for various tools.


As shown, the GeneralBuilder project is the main application for the general Sandcastle API testing. There are four test projects; TestProject1TestProject2TestProject3 and TestProject4, all of which are class libraries containing either one or two classes. However, only one project is used for this test sample for simplicity.
We will now continue to discuss what must be changed to add version information to the documentation.

NOTE: All Sandcastle projects are built using the standard or default installation and styles. Custom styles such as from the Sandcastle Styles project are not used.

Version Information API Processing
We have so far presented the API documentation processing by Sandcastle. Now, we will discuss what will change if you have to support version and platform information.
For the version information, we will change only two steps in the previous procedure to make it work
  • Reflection Builder
  • Processing the Documents
1. Reflection Builder
For the version information, instead of a set of assemblies defining a version, you have a number of sets each defining a version. Each set defines version platform and will produce reflection data. We must combine the reflection data from each set to produce a final reflection data.
Using the Sandcastle article on this, the sequence of processing version information are
  • Run the MrefBuilder.exe tool on each version's assembly set. Note that the assembly set for each version of a project includes the complete set of assemblies, not just the assemblies that are new or changed.
    This means, each assembly set, which is equivalent to version platform, can consists of various versions of the platform.
    For instance, the .NET Framework platform has various releases; 1.0 1.1, 2.0, 3.0, 3.5, 4.0 and 4.5. All these releases define a set.
  • Run the MergeDuplicates.xsl (through the XslTransform.exe) on each of the version-specific reflection files.
  • Run the VersionBuilder.exe with the version-specific reflection files as input and the combined reflection file as output.
  • Proceed with the rest of the Sandcastle build using the combined reflection file.
The reflection and documentation model builder diagram can be modified as shown below:


2. Version Builder
We will now discuss the version builder tool, VersionBuilder.exe, which is used to create the combined reflection data.
The command line to this tool is given below:

VersionBuilder /config:VersionBuilder.config /out:reflection.org

NOTE: A third parameter of this tool is /rip+|-, is a switch; /rip+ to turn on (or true) and /rip- to turn off (or false). The default is on (or true). The option specifies whether to rip old APIs that are not supported by the latest versions. We will come back to this option again, since it is easier if you see it in action.

In order to understand the version builder configuration file, we will return to the illustrative sample and define the documentation structure we will to build with version information.
We will define three platforms with the following information:

Platform 1 Platform 2 Platform 3
Platform ID PlatformId1 PlatformId2 PlatformId3
Platform Label First Platform Second Platform Third Platform
Versions (Projects) TestProject1 TestProject2 TestProject3
TestProject4

We will define the versions with the following information:

TestProject1 TestProject2 TestProject3 TestProject4
Version ID VersionId1 VersionId2 VersionId3 VersionId4
Version Label 1.0 2.0 3.0 3.0 SP

From these we expect the version information section of the output to be as shown below:
Now, the VersionBuilder configuration file specifies the input reflection files that MrefBuilder generated for each version. It also specifies a name for the project and names for each version. The names correspond to the IDs of shared content items for the project and version names that appear in the Version Information section of an API's documentation.
Here is the content of the VersionBuilder configuration file required to define our documentation structure:

<versions>
  <versions name="PlatformId1">
    <version name="VersionId1" file=".\reflection1.org" />
  </versions>
  <versions name="PlatformId2">
    <version name="VersionId2" file=".\reflection2.org" />
  </versions>
  <versions name="PlatformId3">
    <version name="VersionId4" file=".\reflection4.org" />
    <version name="VersionId3" file=".\reflection3.org" />
  </versions>
</versions>

NOTE: The TestProject4 reflection data is placed before the TestProject3 reflection data. This is related to the /rip+|- option, and I will illustrate this later.

3. Processing the Documentations
We need to update the BuildAssembler configuration file to include the version information. We will update the following two build component configurations
  • Copying in Comments
  • Resolving Shared Contents
Copying in Comments
In this case, we just want to highlight important points to avoid confusion.
The original Sandcastle tutorial sample provided by Microsoft on version information used only one comment file, let's explain why. Both the tutorial and the sample presented the basic use of version information, whereby the documentation project has a set of assemblies for a release and next release contains updated versions of the set of assemblies with/without additional assemblies.
The new release contains updated information and anything not included in the new release from the old is considered an old API, which is ripped off by the version builder tool (the /rip+|- option).

In practice, you are dealing with different platforms with many unrelated APIs, such as .NET Compact Framework and XNA Framework. Therefore, the included comments must cover all the supported API in the documentations.
For the illustrative sample, here is the configuration of the CopyFromIndexComponent component.

<component type="Microsoft.Ddue.Tools.CopyFromIndexComponent" assembly="%DXROOT%\ProductionTools\BuildComponents.dll">
    <index name="comments" value="/doc/members/member" key="@name" cache="100">
        <data base="%SystemRoot%\Microsoft.NET\Framework\v2.0.50727" recurse="false"  files="*.xml" />
        <data files="..\Output\TestProject1.xml" />
        <data files="..\Output\TestProject2.xml" />
        <data files="..\Output\TestProject3.xml" />
        <data files="..\Output\TestProject4.xml" />
    </index>
    <copy name="comments" source="*" target="/document/comments" />
</component>

We simply included all the comments from the various sources.

Resolving Shared Contents
We defined the configuration file for the version builder tool using only the platform and version IDs. We will define the platform and version labels in a shared content file and include it in build assembler configuration.
For the provided sample, this file is named VersionsSharedContent.xml, and the configuration of the shared build component is shown below:

<component type="Microsoft.Ddue.Tools.SharedContentComponent" assembly="%DXROOT%\ProductionTools\BuildComponents.dll">
    <!-- The standard contents -->
    <content file="%DXROOT%\Presentation\vs2005\content\shared_content.xml" />
    <content file="%DXROOT%\Presentation\vs2005\content\reference_content.xml" />
    <content file="%DXROOT%\Presentation\shared\content\syntax_content.xml" />
    <content file="%DXROOT%\Presentation\vs2005\content\feedback_content.xml" />

    <!-- The customized contents -->
    <content file=".\SharedContent.xml" />
    <content file=".\FeedbackContent.xml" />
    <!-- For the version information contents -->
    <content file=".\VersionsSharedContent.xml" />
</component>

NOTE: When using the Sandcastle's MSDN-defined platform and version IDs, this file and step is not required.

Again, there is another issue with the original Sandcastle tutorial. By that tutorial, the shared content file will be as shown below:

<content xml:space="preserve">
    <!-- For the first platform -->
    <item id="PlatformId1">First Platform</item>
    <!-- List of versions in first platform -->
    <item id="VersionId1">1.0</item>

    <!-- For the second platform -->
    <item id="PlatformId2">Second Platform</item>
    <!-- List of versions in the second platform -->
    <item id="VersionId2">2.0</item>

    <!-- For the third platform -->
    <item id="PlatformId3">Third Platform</item>
    <!-- List of versions in the third platform -->
    <item id="VersionId3">3.0</item>
    <item id="VersionId4">3.0 SP</item>
</content>

This, however, does not include the complete definition of the platform labels when you compile the help and the result is as displayed below (empty filters):


The complete definition of the platform must include three labels for each platform and must be in the format:

<item id="(Platform ID)">(Platform Label)</item>
<item id="Include(Platform ID)Members">Include (Platform Label) Members</item>
<item id="memberFrameworks(Platform ID)">Frameworks: (Platform Label) Only</item>

Now, applying this to the sample project, the shared content file is shown below:

<content xml:space="preserve">
    <!-- For the first platform -->
    <item id="PlatformId1">First Platform</item>
    <item id="IncludePlatformId1Members">Include First Platform Members</item>
    <item id="memberFrameworksPlatformId1">Frameworks: First Platform Only</item>
    <!-- List of versions in first platform -->
    <item id="VersionId1">1.0</item>

    <!-- For the second platform -->
    <item id="PlatformId2">Second Platform</item>
    <item id="IncludePlatformId2Members">Include Second Platform Members</item>
    <item id="memberFrameworksPlatformId2">Frameworks: Second Platform Only</item>
    <!-- List of versions in the second platform -->
    <item id="VersionId2">2.0</item>

    <!-- For the third platform -->
    <item id="PlatformId3">Third Platform</item>
    <item id="IncludePlatformId3Members">Include Third Platform Members</item>
    <item id="memberFrameworksPlatformId3">Frameworks: Third Platform Only</item>
    <!-- List of versions in the third platform -->
    <item id="VersionId3">3.0</item>
    <item id="VersionId4">3.0 SP</item>
</content>

The filters will now correctly be displayed as:


The sample project, VersionInfoBuilder, is completed and is shown below:


Ripping Old API: /rip+|- Option
As promised, we will now illustrate this option. The version builder does not check your assembly versions, and to make sure you see it; all the test projects versions are set to 1.0.0.0.
The version builder, however, uses the order in which the versions are defined in a platform.
Let us illustrate this with the Platform 3, which consist of two versions; Version 3 and Version 4. At the code level, the only difference between these two versions is that Version 4 includes an additional property named Value in the class TestOther. With the configuration shown above and default rip off option (on or true), the output is correctly shown below:


However, if you reverse the order of Version 3 and 4, placing the Version 3 before the Version 4 and with the rip off (on or true), the version builder will consider the Value property as old and it will be ripped off as shown below:


Fixing Grouped or Container Pages
In our sample, we defined our own platform and version IDs. Sandcastle, however, assumes only the platform and version IDs defined for the MSDN will be used. The result is that when you compiled the version information help file, the container or grouped pages such as the Members, Constructors, Methods and Properties pages in your document will be empty as shown below:


One quick way to fix this issue is to apply the fix provided by a Sandcastle user by name SanderSaares on Sandcastle Styles forum.

Member list fix for SHFB Version Builder compatibility

This fix extends the support to non-MSDN platform IDs. Please go to that thread and apply the fix, it works. The result will be as shown below:


Sample Test Applications
The test applications used in this article are available for download. Use this to complete your understanding of the version information.


The sample is released under the Ms-PL license, which is used by the Sandcastle. You can use it anyway you like.
NOTE: This is a zip file shared from Google Docs. If the download button is not displayed when clicked, you can download the zip file from the File menu.

Conclusions
Whether you build your documentations directly using the Sandcastle command line tools or you use third-party GUI tools, you need a better understanding of the Sandcastle version information processing to structure your documentation project  for better results.
In this article, we have examined the Sandcastle build process and extended that knowledge to building documentations with version information.
The last part of this series will examine platform information support. Thank you.